Deploying IPv6 on a home or office network with FreeBSD and a tunnel broker
With IPv6 as the replacement for IPv4 and three of the five regional Internet registries already exhausted their allocation of all the blocks they have not reserved for IPv6 transition it is important to start implementing IPv6 now.
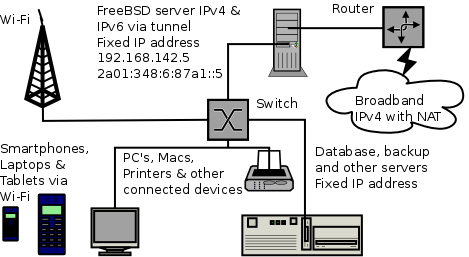
The objective of this tech article is to deploy IPv6 network access to a home or office network as a dual-stack option alongside IPv4 helping the internet stay open and easily grow as the number of devices and users grows.
Ideally, a direct connection would be preferred, alas here in the UK as in many other countries this is not widely available; thank you tunnel brokers for offering access.
Requirements
- FreeBSD
- Permanently on connection with IPv4
- IPv6 tunnel broker
Notes
This article uses FreeBSD 10 but any current version is supported, check the IPv6 page in the excellent handbook for configuration examples for the different versions (see resources).
Ensuring a smooth and successful tunnel, this article uses the AYIYA (Anything In Anything) option with AICCU (Automatic IPv6 Connectivity Configuration Utility) from SixXS for which they received an Award Of Excellence.
The Hurricane Electric tunnel that replaced the Sixxs one after they sunset their service is easier to set up with online help, example configurations, certification, toolkits and more.
Securing a network is outside the scope of this article, IPv6 is broadly similar to IPv4 so most of the usual precautions apply.
Tasks
- Connect to ipv6
- Deploy IPv6 to your network
- Configure services such as mail, http and database
- Configure DNS and let them know
Connect to IPv6
The first thing is to obtain access to IPv6.
Request an account
The sign-up to Sixxs was a manual (human) process so ensure you provide real information. Wait for the approval email, which could take from a day to a week, patience is a virtue.
Request an AYIYA tunnel
After you select your country you will be asked to choose which Point of Presence you wish to connect to. If you have a choice of PoP's ping them to see which is fastest (closer). Wait for the approval mail, which should follow within a reasonable time.
Configure your tunnel
The easiest way to connect is by using AICCU. AICCU (Automatic IPv6 Connectivity Client Utility) makes it easy for users to get IPv6 connectivity. AICCU is used to automatically configure the tunnel. AICCU supports TIC (Tunnel Information & Control protocol), which it uses for retrieving the tunnel configuration information, AYIYA, which allows tunnels to be created even behind firewalls and NAT's.
Configure the server for IPv6 with the following settings in /etc/rc.conf
- ipv6_gateway_enable="YES"
- ipv6_activate_all_interfaces="YES"
- ipv6_defaultrouter="[PoP IPv6 Endpoint]"
After adding the entries, reboot the server for them to take effect. The settings can be actioned manually without rebooting the server if preferred, see the FreeBSD IPv6 page in the excellent manual for details.
Unless other tunnels are in use, there should not be any gif[0-9] or tun[0-9] interfaces defined or referenced in /etc/rc.conf as aiccu tunnels through tun0 and sixxs-aiccu creates the pseuto-device as necessary. You can verify which network devices are available with the ifconfig command.
Install net/sixxs-aiccu from the ports collection, pkg install net/sixxs-aiccu.
Set a TIC Password for your tunnel
Configure /usr/local/etc/aiccu.conf
- username <your nichandle/username>
- password <your TIC password>
- protocol tic
- ipv6_interface tun0
- verbose true
Respecting the Sixxs warning to never run AICCU from an automated script there is no entry in rc.conf. If you are confident you have a working setup adding '@reboot service sixxs-aiccu onestart' to root's crontab may be an alternative.
When troubleshooting AICCU check either /var/log/messages or stdout
With everything ready, it's time to start the tunnel
/usr/local/sbin/sixxs-aiccu start /usr/local/etc/aiccu.conf
If you have verbose=true then you should get positive confirmation that the tunnel has been set-up.
Check that the tun0 device has been set-up
% ifconfig tun0
tun0: flags=8051<UP,POINTOPOINT,RUNNING,MULTICAST> metric 0 mtu 1280
        options=80000<LINKSTATE>
        inet6 fe80::2c0:9fff:fe3b:ab23%tun0 prefixlen 64 scopeid 0x4
        inet6 fe80::48:6:7a1:2%tun0 prefixlen 64 scopeid 0x4
        inet6 2a01:348:6:7a1::2 --> 2a01:348:6:7a1::1 prefixlen 128
        nd6 options=21<PERFORMNUD,AUTO_LINKLOCAL>
        Opened by PID 2755
As can be seen from the above example
- The interface is up and running
- The tunnel is represented by inet6 2a01:348:6:7a1::2 --> 2a01:348:6:7a1::1 prefixlen 128
- The tunnel process running sixxs-aiccu is 2755
Test connectivity using ping6
% ping6 -c1 2a01:348:6:7a1::1
PING6(56=40+8+8 bytes) 2a01:348:6:7a1::2 --> 2a01:348:6:7a1::1
16 bytes from 2a01:348:6:7a1::1, icmp_seq=0 hlim=64 time=39.667 ms

--- 2a01:348:6:7a1::1 ping6 statistics ---
1 packets transmitted, 1 packets received, 0.0% packet loss
round-trip min/avg/max/std-dev = 39.667/39.667/39.667/0.000 ms
Static addresses
Services such as nameservers, websites, databases and mail servers are usually always available. Although the DNS is designed to translate a name to an ip address allowing for ease address changes, managing the DNS is easier if those services have a fixed or static ip address.
A technique that may be useful is to name the IP6 addresses in a similar fashion to IP4.
Keeping things simple can be straightforward as small networks often use a single subnet, it makes sense to use the last set of numbers from IP4 in IP6. Although the addresses use a different system, in ip4 the addresses are base 10 and ip6 they are hexadecimal so after 1-9 where they appear identical, ip4 = 10 and ip6 = a, ip4 = 192 and ip6 = c0, ip4 = 244 and ip6 = f4, etc. Nevertheless it is a useful human convenience.
For example:
- 192.168.142.5 is translated as 2a01:348:6:87a1::5
- 192.168.142.240 is translated as 2a01:348:6:87a1::240
- ifconfig_em0="inet 192.168.142.5 netmask 255.255.255.0"
- ifconfig_em0_ipv6="inet6 2a01:348:6:87a1::5 prefixlen 64"
% ifconfig em0
em0: flags=8843<UP,BROADCAST,RUNNING,SIMPLEX,MULTICAST> metric 0 mtu 1500
        options=209b<RXCSUM,TXCSUM,VLAN_MTU,VLAN_HWTAGGING,VLAN_HWCSUM,WOL_MAGIC>
        ether 00:c0:9f:3b:ab:23
        inet 192.168.142.5 netmask 0xffffff00 broadcast 192.168.142.255
        inet6 fe80::2c0:9fff:fe3b:ab23%em0 prefixlen 64 scopeid 0x1
        inet6 2a01:348:6:87a1::5 prefixlen 64
        nd6 options=21<PERFORMNUD,AUTO_LINKLOCAL>
        media: Ethernet autoselect (100baseTX <full-duplex>)
        status: active
Deploy IPv6 to your network
Once you have IPv6 working, the next task is to start offering it to the rest of your network.
IPv6 hosts can configure themselves automatically when connected to an IPv6 network, to achieve this configure the router advertisement daemon (rtadvd). SixXS may have already given you a subnet when you requested your tunnel, simply enter the subnet into /etc/rtadvd.conf on the server and restart the service.
em0:\
    :addrs#1:addr="2a01:348:6:87a1::":prefixlen#64:tc=ether:\
    :rdnss="2a01:348:6:87a1::5":\
    :dnssl="example.com":
The addr is your subnet prefix and is probably a 64, as the ip address contains colons it must be surrounded by double quotes.
The rdnss is/are the Recursive DNS server(s) that hosts can use to lookup address records for the services and websites they use.
The dnssl is the DNS Search List contains one or more domain names suffixes.
Alternative to stateless configuration are, stateful configuration can be offered with the Dynamic Host Configuration Protocol version 6 or they can be configured manually.
Most clients including Windows, Mac, iPhone, Android and Linux will use IPv6 if it is available, older machines may need configuring for example Windows XP.
FreeBSD clients
The install routine would have enabled IPv6 if asked, else to configure an existing FreeBSD system as an IPv6 client, add these two lines to rc.conf not forgetting to replace em0 with your interface:
ifconfig_em0_ipv6="inet6 accept_rtadv"
rtsold_enable="YES"
The first line enables the specified interface to receive router solicitation messages. The second line enables the router solicitation daemon, rtsol(8).
WiFi
You'll be pleased to know that it Just Works (TM). WiFi works by bridging the network and the client, by passing IP packets the WiFi router by default also passes IPv6 as well as IPv4 packets and so it works transparently.
Configure services such as nameservers, mail, http and database
Most software works with IPv6. Just as you tell an application which interfaces or addresses to listen to on IPv4, you do the same for IPv6. Although full details of how to setup client software is outside the scope of this article, a few pointers for common cases is offered here for convenience.
Bind
The Domain Name System is the directory service that translates friendly names such as p-o.co.uk into ip addresses such as 80.229.143.200 and 2a01:348:6:87a1::5.
Running bind can be simple or complex depending on your requirements. For example using the listen-on-v6 option in /usr/local/etc/namedb/named.conf can be as simple as adding your local IPv6 address.
listen-on-v6    {
        ::1;
        2a01:348:6:87a1::5;
};
If you are using acl's you probably want to add your subnet.
acl "internal" {
    192.168.142.0/24;
    127.0.0.0/24;
    ::1;
    2a01:348:6:87a1::/64;
};
Chances are that if you are running a nameserver locally your requirements are more complex and so you are advised to check the various documentation for configuration options.
The FreeBSD handbook has good documentation on the Domain Name System (DNS).
The SixXS website has an example for adding a reverse DNS zone.
See the BIND documentation for more information.
Apache
To configure an Apache web server to accept connections on port 80, on all interfaces including IPv6 and IPv4, use:
Listen 80
Configuring Apache HTTP Server to listen on specific addresses and ports:
Listen [2a01:348:6:87a1::5]:80
Listen [2a01:348:6:87a1::5]:443
See the Apache documentation for more information.
Exim
By default, Exim the mail transfer agent listens on all available interfaces, on the SMTP port.
local_interfaces = <; ::0 ; 0.0.0.0
Exim can be configured to listen on specific interfaces such as
local_interfaces = <; 127.0.0.1 ; ::1 ; 192.168.142.5 ; 2a01:348:6:87a1::5
See the Exim documentation for more information.
DBMail
Configuring DBMail to offer SMTP and POP services on all interfaces
bindip = 0.0.0.0,:: # IPv4 and IPv6 - all IP's (BSD)
To connect to the database using IPv4 or IPv6
dburi=database://[user:password@][host][:port]/database[?propertyName1][=propertyValue1][&propertyName2][=propertyValue2]...
dburi=mysql://localhost:3306/test?user=dbmaildb&password=******
dburi=postgresql://localhost:5432/dbmaildb?user=dbmailuser&password=******
See the DBMail website and the libzdb website for more information.
PostgreSQL
Configuring PostgreSQL for IPv6 is as easy as setting listen_addresses to all in postgresql.conf. The special entry * corresponds to all available IP interfaces. The entry 0.0.0.0 allows listening for all IPv4 addresses and :: allows listening for all IPv6 addresses.
listen_addresses = '*'
Individual addresses can be specified
listen_addresses = '192.168.142.5,2a01:348:6:87a1::5'
Client authentication is configured in pg_hba.conf
See PostgreSQL documentation for server settings and client authentication for more information.
MySQL
Configure MySQL with bind-address set to :: and the server accepts TCP/IP connections on all server host IPv4 and IPv6 interfaces.
bind-address = ::
See MySQL documentation for more information.
Configure DNS and let them know about IPv6 as well as IPv4 services
Adding IPv6 addresses can be as simple as adding an AAAA record, for example hosteurope.com run the nameserver for p-o.co.uk and so adding and IPv6 address is as simple as logging onto their website and adding an AAAA with 2a01:348:6:87a1::5.
If you are running a local DNS nameserver then using nsupdate the Dynamic DNS update utility that comes with BIND can be as easy as
% nsupdate
> update add p-o.co.uk 3600 aaaa 2a01:348:6:87a1::5
> send
> quit
Test the entry
% dig +short p-o.co.uk aaaa
2a01:348:6:87a1::5
% dig +short p-o.co.uk
80.229.143.200
Adding a reverse DNS or PTR entry is just as easy
% nsupdate
> update add 5.0.0.0.0.0.0.0.0.0.0.0.0.0.0.0.1.a.7.8.6.0.0.0.8.4.3.0.1.0.a.2.ip6.arpa. 3600 ptr schnittke.p-o.co.uk
> send
> quit
Test the Reverse DNS (PTR) entry
% dig +short -x 2a01:348:6:87a1::5 ptr
schnittke.p-o.co.uk.
See the BIND documentation for more information.
By Alan Hicks
Postscript
IPv6 tunnel, training and support provided by https://tunnelbroker.net/ from Hurricane Electric.
Certification from https://ipv6.he.net/
The HE tunnel is easier to set up and offers example configurations for most operating systems; this article leaves the Sixxs configuration for historical purposes.
Test IPv6 https://test-ipv6.com/